Tech Tip: Easy Email Management with PaperVision® Capture
Our technical experts show you how to import, secure and manage emails effectively with this step-by-step guide on using PaperVision Capture’s Native Documents feature with Microsoft 365.

By Steve Welch, ImageSilo® Administrator and Subject Matter Expert
Are your customers who use Microsoft Office 365 looking for an easy, efficient way to organize, utilize and secure their emails using their information management system? The Native Documents feature within PaperVision® Capture (versions R97.2 and newer) makes it simple to import and manage emails. The feature captures applicable emails from a specific folder and creates batches for processing.

Email management is one of the biggest challenges facing today’s businesses. With the number of sent and received emails projected to increase to 376 billion per day by 20251, the productivity and security challenges are significant. Emails are time consuming to manage and often require preservation far into the future for legal reasons, including lawsuits. (Read more about the Federal Rules of Civil Procedure requirements here.)
By using PaperVision Capture’s Native Documents feature to process emails, users increase productivity, speed record retrieval and improve compliance. The feature is available for users of the Microsoft 365 platforms and stand-alone Outlook.com and Gmail email services. Here’s a step-by-step guide to getting your customers who use Microsoft 365 up and running:
How to use Native Documents feature to manage Microsoft 365 emails
The Native Documents feature is an automated job step within PaperVision Capture. For your customers who use Microsoft 365 and want to use Native Documents to manage their emails, follow these steps:
- With the Capture job open, double-click the Native Documents Step.
- On the Properties tab, if necessary, expand Native Documents.
- Click Native Documents and then click the ellipses button to open the Configure Native Documents Sources window.
- Click Add a native document source.
- In the Name box, type the name of the Native Documents source.
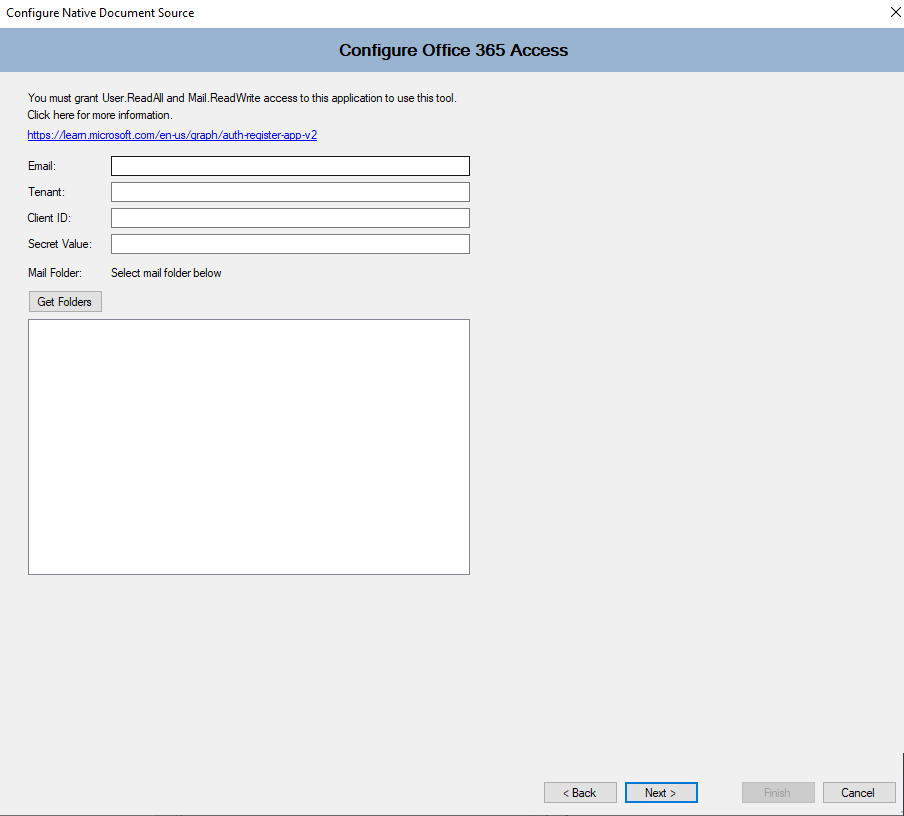
- Select Office 365 from the Source Type.
- Specify the folder from which you want to capture emails.
Note: PaperVision Capture will delete the source emails once they have been captured so it's important to forward all relevant emails to a separate folder for monitoring. - Register PaperVision Capture with the Microsoft identity platform:
- Register PaperVision Capture with the Microsoft identity platform and obtain Mail.ReadWrite and User.ReadAll API permissions.
- Make sure to note the Tenant, Client ID and Secret Value for entry into the Native Documents configuration.
- Instructions for setting up these permissions can be found at https://learn.microsoft.com/en-us/graph/auth-register-app-v2

- On the Map Message Fields to Capture Indexes dialog box, you can map message fields to existing PaperVision Capture index fields.
- Click Next to open the Choose Native Document File Types dialog box. Here you can select the document type of email attachments that you want to import. Select Convert message body to image if you want to import the contents of your email message.
- If you selected Microsoft Word, Microsoft Excel, or Microsoft PowerPoint presentations, you will need to configure the converted image properties for each file type.
- After you configure the image properties for all of the selected file types, click Next to open the Choose Batch Naming Components dialog box. Here you can configure the batch naming convention by adding from the Available list to the Members list.
- In the Delimiter box, type the character you want to use to separate the entries. A preview of the naming convention will appear below.
- Once you have added and ordered the entries, configure each entry to the corresponding values.
- Click Next to open the Specify Batch Create Conditions dialog box, and specify what conditions must be met before a batch is created.
- Click Next to open the Choose Capture Indexes dialog box and select the indexes you want to populate from the list.
- After the first index is configured, click Next to open the Choose Index Populating Components dialog box for any remaining indexes. Repeat this procedure for all indexes.
- In the Error Handling group, select the method to process errors.
- Click Next to open the Configure Email Notification Settings and configure with your SMTP if needed.
- Click Finish to save your selection
Easy, efficient technology to help your customers manage emails
Using Native Documents in PaperVision Capture to import emails from Office 365 enables your customers to easily streamline document management processes and ensure all relevant emails are captured and processed efficiently.
Native Documents also provides an alternative to PaperVision® Message Manager, the email processing component of PaperVision® Enterprise. For environments where Message Manager does not meet your needs, using the Native Documents feature of PaperVision Capture enables you to:
- Configure a custom source in a Native Documents job step that allows you to capture emails from Gmail and Outlook.com (but not emails from Microsoft Exchange)
- Configure a Native Documents job step to capture emails from Gmail using the username/password authentication option, instead of directly to the Simple Mail Transfer Protocol (SMTP) server
- Convert the email body to an image or Microsoft Office file type, making it more flexible to work with
- Combine converted emails to existing documents in a batch by importing emails into a PaperVision Capture batch that contains documents
For additional assistance on using the Native Documents feature, consult the PaperVision Capture Administration Guide available on MyDSI and Microsoft documentation. In the PaperVision Capture Administration guide, information on configuring the feature can be found in the chapter on Native Documents Step.
For more information about Native Documents setup and features and to better understand how to position the benefits of email management to your prospects, please reach out to your sales representative. Start using this amazing utility to you and your customers' advantage today!
1. https://www.mailbutler.io/blog/email/email-statistics-trends/
Digitech Systems Technical Support