Tech Tip: Configure PaperVision® Folder Monitor article
Get the most from our PaperVision® Folder Monitor technology that enables your customers to move documents easily and securely. Learn from our experts in this how-to guide for setting up and using this valuable technology.

By Alxzandr Allsman, Technical Support

PaperVision® Folder Monitor is a new component in our Enterprise Content Management (ECM) suite of products and services. We want you and your clients to get the most from this technology. With that in mind, we offer this guide to help you set up and use Folder Monitor.
(If you missed our recent Digitech Times article about the launch of this utility, click here. The recording of our recent Digitech Systems University webinar PaperVision Folder Monitor Demonstration & Discussion will show you how to setup and use the product as well.
A quick refresher on the value of Folder Monitor to your sales efforts: This free stand-alone software improves our longtime Directory Manager by giving your customers an easy, user-friendly way to automate batch import and indexing. The added value gives you an advantage when competing for new business or when protecting your existing customer base. Folder Monitor allows companies to:

- Streamline efficiencies and reduce costs by enabling automatic 24×7 upload of folders and files to the ECM system from shared drives, desktop computers, and more.
- Get more value out of scanners, multifunction devices, and other hardware by automatically moving documents to the ECM.
- Improve security of documents by instantly moving them into the ECM where user access and security settings are immediately applied to protect information.
Configuring PaperVision Folder Monitor
- Launch the application.
- Create and configure one or more jobs using the menu tabs. (Note: You can configure multiple jobs to all go to the same destination such as ImageSilo®; the same destination but different entities; or multiple destinations such as ImageSilo plus PaperVision®.com.
The menu tabs:
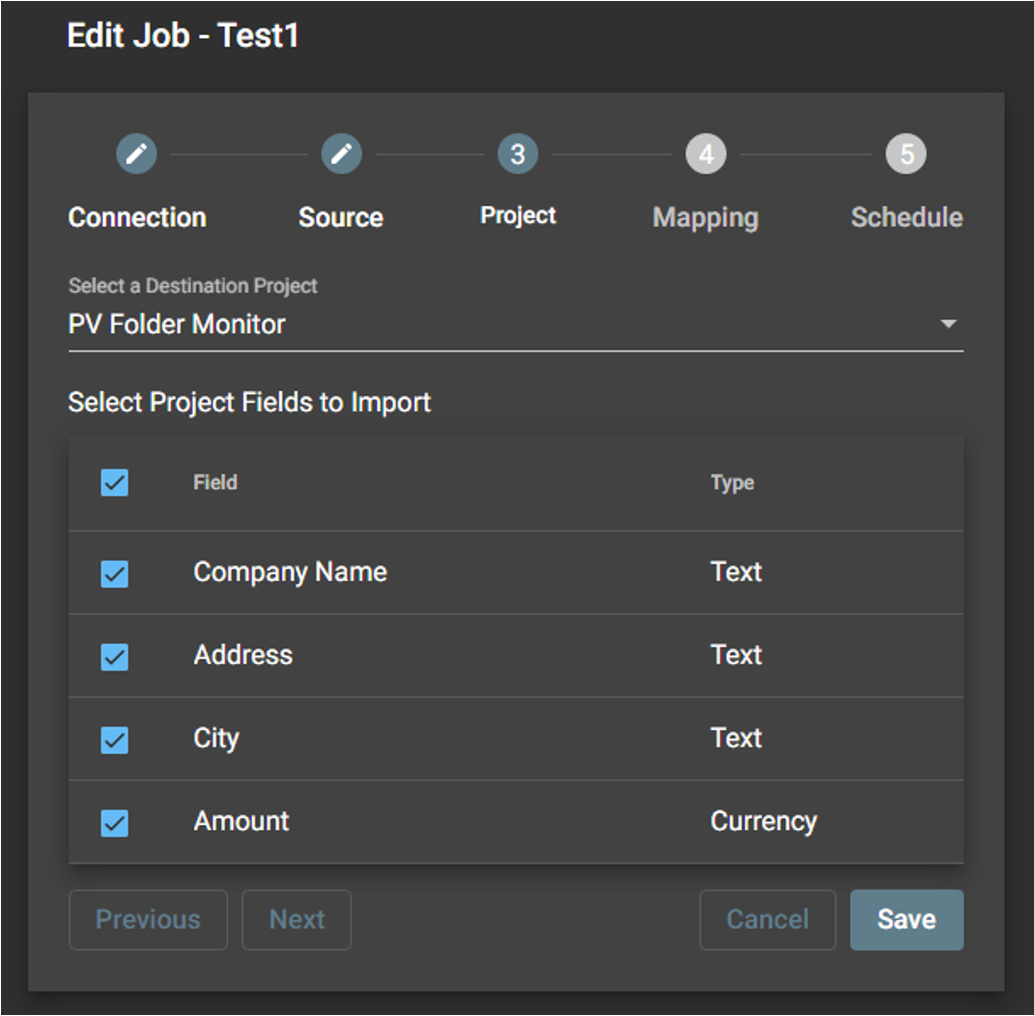
A screenshot shows the Project Tab in the optional dark-mode viewing setting of PaperVision Folder Monitor.
The Connection Tab: Use this tab to select the location where the files will be uploaded to: ImageSilo, PaperVision.com, or PaperVision® Enterprise. Enter the Entity and Username information or use existing credentials from previously saved jobs.
The Source Tab: Use the source tab to configure options related to the files to be uploaded, including the location of the files, a temporary location that will be used to process the files and the location to store any files that were not able to be uploaded.
The Project Tab: Use this to configure information relating to the project where the data will reside once uploaded, including selecting the applicable project fields to import.
The Mapping Tab. Use this to configure (and test) the File and Folder segment delimiters as well as map any project fields.
The Schedule Tab: Use this to configure the options that PaperVision Folder Monitor will use to upload files. You can choose to only have the utility run when a user is logged in the machine or run automatically at a certain day or time.

The Schedule Tab enables you to schedule multiple jobs to run at preset, convenient times
Finishing setup
- After filling out the menu settings, select the Save button and setup is now complete. PaperVision Folder Monitor is ready to send and index files per your configured settings.
In addition to easy configuration, Folder Monitor features a simple, user-friendly design. It gives you more control over index field values. And multiple jobs can run concurrently and at any time – day, night or weekends – using Windows Task Scheduler.
For more information about Folder Monitor’s setup and features and to better understand how to position it to your prospects, please reach out to your sales representative.
Digitech Systems Technical Support