Tech Tip: Setting Up Data Transfer Manager article
Learn directly from our experts on how to set up PaperVision Data Transfer Manager to offer your customers a secure, fast way to transmit content with a duplicate copy maintained for disaster protection. Share with your team.

By: Kayne Jensen, Technical Support Engineer
![]()
Offering your customers a simple way to protect important information from disasters and other cyber emergencies is easy with PaperVision® Data Transfer Manager. Working in conjunction with the PaperVision Data Transfer Service, this robust, automated toolset enables the fast and secure transmission of content and maintains a duplicate copy of all data at a separate site for disaster protection. Also, data can be packaged into a single encrypted and compressed file for transfer between sites.
Getting this feature up and running for your customers is a snap.
On-screen prompts make installation simple
PaperVision Data Transfer Manager (PVDTM) is used to transfer data by copying the files or using FTP. It can be done with or without the use of an SSL certificate. There are multiple ways to transfer data, including “as is” or by creating a package file. Also, jobs can be created to automatically remove old files and directories as needed. PVDTM is included as part of PaperVision Enterprise. No additional license is needed.
Installation is easy.
![]()
PVDTM has the following system requirements:
- Windows XP, or Windows Server 2003 or higher
- Approximately 20 MB of hard disk space
- Additional storage space for creating package files
Installation simply requires the following of the on-screen prompts. After completing the prompts and clicking “Finish,” PVDTM is ready to start working.
Note: The PaperVision Data Transfer Service is a true Windows service. As a result, the service is configured and starts as soon as PVDTM starts. Since it is a true service, there is no need for a user to be logged into the computer for the service to work.
Authorize users in a few clicks
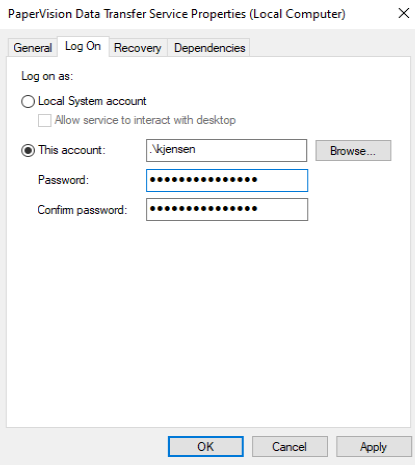
By default, the data transfer service is set to run under a “LocalSystem” account. Since this account doesn’t usually have access to network shares or many file locations on the computer, it is necessary to change the user associated with the service.
Here is a quick and easy way to assign the user:
-
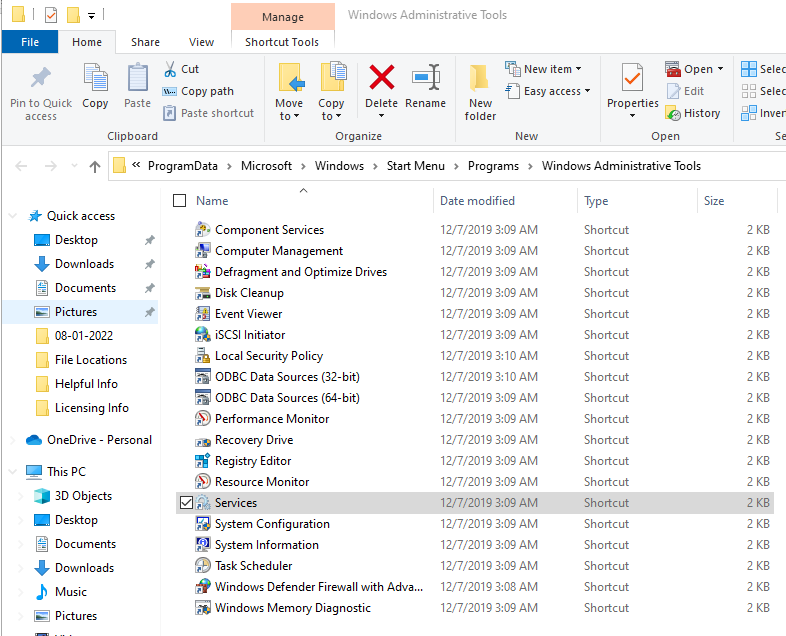
Navigate to C:\ProgramData\Microsoft\Windows\Start Menu\Programs\Administrative Tools\Services. This will open the Windows Services window.
-
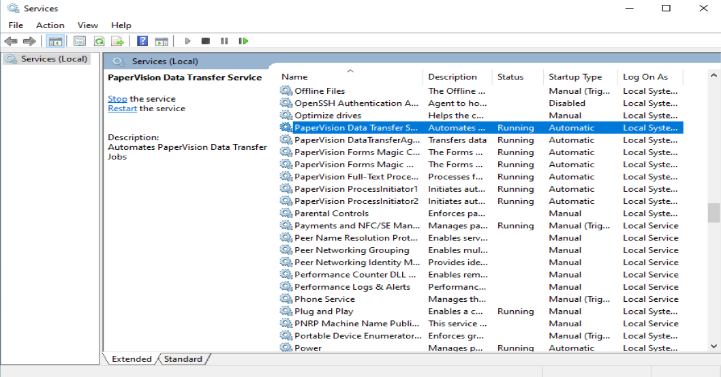
The Services window lists all of the installed services on the computer. Navigate to the PaperVision Data Transfer Service in the list of services and double click to open up the service properties.
-
Choose the Log On span. Select This account. The browse button can be used to help find a user or to make sure that users have the necessary read/write permissions to any location that files will be moved to or from.
Hit the “start” button
Once the credentials have been entered, the data transfer service must be restarted. This can be done by going to the General tab for the data transfer services properties and selecting Stop at the bottom of the window. Then, click Start. Make sure to select OK when finished.
A disaster or other cyber emergency could cause a devastating loss of important information for any size business. PaperVision Data Transfer Manager provides a fast, secure solution. Grow your business by showing customers the benefits of this easy-to-install, simple-to-use, and FREE part of the content management tools you already offer. Please reach out to your sales representative for more information on this feature.
Digitech Systems Technical Support